Saturday, December 10, 2011

Some Hanging Decor {Deck The Halls}

So I found this idea on pinterest as you can see on my 12 Crafts of Christmas post. I decided I wanted to have some fun with some of my extra ornaments and make a hanging center piece from my chandelier.  So here it is dolls. 
Check it out.

Step 1: Get It Together
Just grab whatever your little heart desires.  I used my blue ornaments with some silver, white, and blue ribbon. I also made sure I had different sizes and different thickness.
 Step 2: Tie Your Ribbon to Your Chandelier 
I tied the ribbon so that both sides could hang down.  I did different lengths to give it a little dimension. 
Step 3: Add Your Ornaments
Thread your ribbon through your ornament and tie a not.  After adding the ornament I cut a triangle out of the end of the ribbon. 
 Step 4: Adjust Your Levels
Move your ornaments around. Make sure your colors and ornament sizes have some balance.
 Step 5: Add Some Spirals 
To give it a little more depth I added some spiral ribbon pieces.  Just tie them at the top just like you did with the other ribbon.  Once again, I had some different lengths to mix it up.
Step 6: Use Your Extras
I just grabbed a basket and arranged the ornaments by color and size. 
 The Finished Product 
&

As always let me know what you think! :)
Kierstyn.


Monday, December 5, 2011

Our Best Bites {The Recipe Book}

So I'm walking a long in a big warehouse store and I look over and find the most amazing thing... Our Best Bites recipe book!  Their site is where I got my yummy berry cobbler recipe and I have them featured on my button list. Make one of their recipes for breakfast, lunch, dinner, and dessert today!


Friday, December 2, 2011

The 12 Crafts of Christmas {A Twist to The Song}

"On the 1st day of Christmas my true love Kierstyn gave to me....a fantastic...craft...idea..."  Sorry I'm not much a singer. However, I have found 12 crafts to do this month.  I would lets get crazy and do a full 25, but I'm going to be honest... I don't have time for that.  There ya go I said it.  I have a life believe it or not (probably not). Well friends here ya go...


Craft 1: The Wreath
A fun twist on the traditional wreathe. LOVE, love, love. 
Craft 2: Count Down Cookie Pan
This would be a great gift for friends and family. Maybe with a homemade treat on top?
Craft 3: Light-Up Glass Snowman
Love the idea of using lights and vinyl to bring this snowman to life.
Craft 4: Snowman Ornament Centerpiece
So darling. Thumb prints for cheeks and some simple brush work.
Craft 5: Subway Art to Frame
This would be a very simple decoration. Find a cute frame and BAM you have a decor item.
Craft 6: Picture Block Ornament
Great Christmas gift for the grandparents. 
Craft 7: Jingle Shadow Box
Darling gift idea or just decor
Craft 8: Deco Mesh Tree
Darling light up decoration for your home.
Craft 9: Door Decor
I know, I know, this doesn't really fall into the craft category, but it is a DIY. So cute too!
Craft 10: Chandelier Ornament Decor
Borderline craft again, but you gotta love this! How cute this would be about the table.
Craft 11: Advent Calendar
I think this is a darling idea. There are multiple ways to go about this.
Craft12: Cheaper Yarn Wreath 
This wreath is a cheaper alternative to the first wreath. I would probably add a little more to it though.

As usual tell me what you think, your experiences, or if you find some fun crafts feel free to share and I will feature you!

Wednesday, November 30, 2011

Oh Christmas Tree {Just a Couple Tips}

I love decorating for Christmas.  Hanging the garland.  Putting up the little doodads here and there. Twinkle lights here and there.  Most of all I love decorating the centerpiece of the season... the Christmas tree! Oh, how I love it so...hmmmm.  Anyways, there are a couple things I'm learning here and there. 

  1. Get Inspired:  I went to one of my favorite stores for Christmas decor to check out their displays. I found one tree that stood out and bought the decor I saw on the tree.
  2. Choose Your Items:  I used a wood letters, ribbon, and wooden ornaments.  Simple enough right? Well make sure each piece compliments the other.  Even if you only choose a few things try and get them in different sizes to give a little more variety. 
  3. Know When to Stop: I don't know about you but I could add every Christmas decor item I have to my tree.  I know a lot of the stores put so much on tree that you can't even see the branches anymore, but that is because they are trying to sell a product.  You can put on too much.
Now this is all just my opinion and a couple things I've heard.  

Here is my tree for this year. Unfortunately, I had a hard time getting a good picture of the tree all lit up.


More decor to come. :)
Feel free to share your tree.

Tuesday, November 29, 2011

Christmas Sock Centerpiece {Dec. Decor}

Oh pinterest you did it again! So my lovely new table is looking very bare for christmas. I have tried everything but nothing quite fit. Well I found this lovely christmas sock centerpiece. Darling idea! My how to will be up asap.

Inspired by: Luxefinds


Monday, November 21, 2011

Pumpkin Chocolate Chip Bread {MY FAVE!}

One of my favorite things to buy from Great Harvest this time of year is Pumpkin Chocolate Chip bread.  It's my all time favorite sweet bread.  This year however I decided I wanted to make it myself.  So here we go!

Pumpkin Chocolate Chip Bread

Ingredients:3 cups white sugar
1 (15 ounce) can pumpkin puree
1 cup vegetable oil2/3 cup water
4 eggs
  • 3 1/2 cups all-purpose flour
  • 1 tablespoon ground cinnamon
  • 1 tablespoon ground nutmeg
  • 2 teaspoons baking soda
  • 1 1/2 teaspoons salt

  • 1 cup miniature semisweet chocolate chips
  • 1/2 cup chopped walnuts (optional, I did not use nuts)


How To:
Preheat oven to 350 degrees.
Grease and flour 9x5 loaf pans.
In large bowl, combine: sugar, pumpkin, vegetable oil, water, & eggs.
Mix until smooth.
In small bowl, combine: flour, cinnamon, nutmeg, baking soda, & salt.
Combine wet and dry ingredients. 
Add chocolate chips & nuts (optional).
Bake for 1 hour or until you can insert a knife and pull it out clean.
Cool on racks.
& enjoy!


Feel free to share how this turned out for you.  
It turned out super yummy for me! :)

Sunday, November 20, 2011

Framed Pumpkins {Fall Craft}

This ended up way cuter than I expected to be honest.  It was pretty simple.  I was inspired by pinterest on this one.  Did I mention this craft was under $8 bucks! 
 You will need hot glue, frame, and styrofoam pumpkins 
 As crazy as it sounds I used a bread knife to cut the pumpkin 2/3 into the pumpkin.
 I used my hot glue gun and made circles with the glue and placed it directly on the glass.  (You do have the option to just glue the pumpkins to the paper instead of the glass)
TA-DA!!! Simple fall decor. May I just say how lovely it looks hung on the wall. 

Tuesday, November 8, 2011

MOVING

Right now we are in the middle of moving. Even better we don't have TV or internet!! I will get on this.  I have an AWESOME craft to share.  :) Hold tight.

love.

Monday, October 31, 2011

Feeling Fall {5 Crafts I MUST Do}

The Framed Pumpkin
 This is the How To for the Fall Decor Framed Pumpkin: Creations By Kara

Fall Wreath {with a couple color adjustments}
No how to. Just where it's inspired from. Bright Bold Beautiful.
(may do a different one since I LOVE a similar one for Christmas...)

Fall Scrapbook Paper Tree
Maybe more fall like paper. Scrapbook Paper Tree: Everyday Mom Ideas

Fabric Fall Wreath

Table Decor Idea
No Linky Link.


Look for my version of these
coming soon.

{if you do them first please feel free to show pictures and tips}

HaPPy FaLL {Pumpkin Chocolate Chip Cookies}

All I have wanted for Halloween is a yummy treat and to put my little man in his tiger costume!!! Well what better way to kick off Halloween than to cook up my FAVORITE cookies!

Halloween Pumpkin Chocolate Chip Cookies
makes about 2 dozen give or take a few 

Ingredients:1 cup canned pumpkin
1 cup white sugar
1/2 cup vegetable oil
1 egg
2 cups all-purpose flour
2 teaspoons baking powder
2 teaspoons ground cinnamon
1/2 teaspoon salt
1/4 teaspoon ground cloves
1/4 teaspoon nutmeg
1 teaspoon baking soda
1 teaspoon milk
1 tablespoon vanilla extract
2 cups semisweet OR milk chocolate chips
1/2 cup chopped walnuts (optional)

How To:
Preheat oven at 350 degrees.
Combine pumpkin, sugar, vegetable oil, and egg. In separate bowl mix flour, baking powder, cinnamon, salt, ground cloves, and nutmeg.
Dissolve baking soda in milk and mix into dry mixture. 
Combine dry mixture and pumpkin mixture in one bowl.
Add chocolate chips and vanilla (and nuts if you wish) to combined mixture.
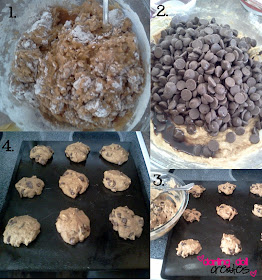
On a greased cookie pan drop spoonfuls of cookie dough onto pan. 
Cook for 10 minutes or until
Let cool for about 5 minutes on cooling rack

& Enjoy! 

Monday, October 24, 2011

A DEAL YOU CAN'T MISS {Minky Couture Blankets}

double post alert!!! 
Usually I don't do a double post because I don't want to over shadow anyone, BUT this is a one day deal you cannot miss!

Okay so I want one of these super oober bad! Well boys and girls today I was watching Good Things Utah *Good things utah, GOOOOD THINGS UTAH, WHERE THE GOOD THINGS ARE!* Catchy song! You know what I mean if you live here in Utah and have ever seen the show.  Back to the blanket though.

TODAY ONLY 40% OFF your entire online purchase if you enter goodthingsutah in the coupon entry at the end of your check out!


Do not miss this! 
Get em here:

May I Help Monday! {Miss LeighAnn & DIY T-shirt to Vest}

I am sooooooooo excited to share this lovely vest idea that Miss LeighAnn Johnson found for me.  She is a doll.  Great ideas {that I'm always repining on pinterest}.  She is a friend that I met from an old friend that happens to be her hubby now! She has a great eye for DIY.  She found this lovely idea on pinterest.com and was kind enough to notify of what a great idea this is.  Check it out and let us know what you think!?


Thanks LeighAnn for being my first little helper on May I Help Monday!

{found by LeighAnn, on pinterest.com, posted on http://wobisobi.blogspot.com}

Saturday, October 22, 2011

Better Late Than Never {DIY Pom Pom Necklace}


I have finally done it! I made the pom pom necklace. I know! Took me FOREVER!!!! The crazy thing is it only took 15 minutes to make. I know, right!? Good news is if you are in my ward (well ward before we move) then I will be doing this at our Super Saturday. Should be a good time! For all of you that don't get to see it done in person here is my way of doing the Pom-Pom necklace.

The Finished Product 
{can you believe this is from an old t-shirt}


What you will need:
Flat Round Charm & Chain
Old T-Shirt (or any cotton fabric really)
Pen
Scissors
Tooth Pick
Hot Glue Gun & Glue

So I grabbed one of my husbands old shirts so that just goes to show it can be ANY shirt or fabric.  It's one of his old grunge shirts that he hardly uses anymore. (Oh by the way I used your shirt when you were at work sorry about the hole babe. Loves!) The charm I got at Hobby Lobby. They have lots of different sizes. I chose the 1 inch flat charm for $1.99 (sometimes you can get them 1/2 off). 

Step 1: Draw & Cut Your Circles

{excuse the Halloween table cloth. I just am so excited for Halloween lol}

I just used the charm to draw the circles. I recommend not making a solid circles like I did just because after it was complete I had to trim off some of the pen that was showing on the tips.  Cut out about 10-15 circles. Just remember the more you do the tighter it will be. 

Step 2: Bunch Your Fabric & Glue


Take your fabric circle and push the tooth pick into the middle so it bunches like a rose.  Then take the pinched together part and put a small amount of glue on it.  Immediately stick it to the charm.  Start in the middle and work to the outer part of the charm.   

Repeat Step 2 until "Pom-Pom'd" to your liking.

Step 3: Trim it up

I just trimmed it up a little here and there. I didn't want it to look too clean cut, but I did trim off any pen that was showing like I mentioned before. 


And just like that you have a fabulous necklace.

{inspired by The Stay At Home Artist found on pinterest.com}